Create a Help File or Manual in Ten Steps
The methodology of creating a help file or writing a printed manual implies that you understand the product or process you are describing. Also you should analyze the target audience, learn their needs and technical level, and then plan the structure and content of your help file.
Below you will find an instruction explaining how to create a help file, manual, or other kind of documentation in ten steps using a help authoring tool.
1.) Download a help authoring tool
To create a help file, you need to install a help authoring tool first. To download one of the recommendable help authoring tools, you can click on the button below.
Installation process:
- Double-click on the setup.exe file to proceed to the installation process. The setup program will let you change the destination directory, select dictionaries used by the in-built spell-checker engine, and other installation options.
- After the installation is complete, you can immediately run the help authoring tool, or you will be able to start it later by double-clicking the program's icon on the desktop.
File information and terms of use:
For more details on the software download and terms of use, click here.
2.) Create a new help project
In any help authoring tool, a help project is the source of the help file or document that you are creating. In other words, a help project is a file that stores all the information such as the content of help topics, TOC, keyword Index, images, and you can compile your source help project into a help file or, for example, into a PDF document.
Thus, on this step you need to start a new help project:
- Click the File tab.
- In the left pane, click New.
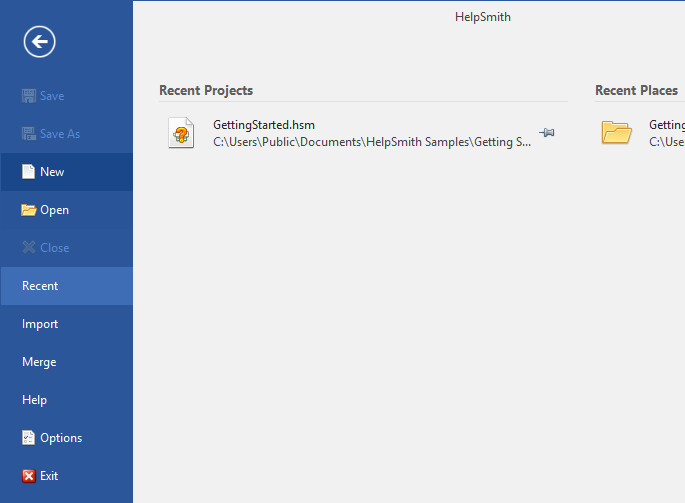
Creating a new help project

Creating the Table of Contents
3.) Prepare the Table of Contents
After you have started a new help project, you can focus on planning and creating the structure of your help file. You can use the integrated Table of Contents editor to add chapters, sub-chapters and topics.
For example, to add a new chapter or topic into the TOC:
- Click the Project tab.
- Click the Add button.
- In the dialog window, select the item type you want (for example, Topic or Heading for a chapter).
- Enter the item Title.
- Click OK.
Of course, you will be able to add more TOC items and re-organize the structure of the Table of Contents at any time. To do that, you can simply drag-and-drop a selected item (or items) to another place of the TOC.
4.) Write content, insert tables, and other objects
When you have added a couple or more help topics, you can focus on the content of your help file. Using the word-processor integrated into the help authoring tool, you can create a document by writing text, inserting images, tables, and using hyperlinks to link to other help topics.
To insert a table into a help topic:
- Click the Insert tab.
- In the Tables group, click the Table button.
- Select the desired number of rows and columns (you will be able to modify this later by editing the table).
Similarly you can insert other objects into the content of a help topic. As you can see, on the Insert tab, you can select a page break, a horizontal line, a hyperlink, bookmark, and some advanced objects like conditional text block, HTML code, variable, and a breadcrumb.

Writing help file content

Adding an image to a help file
5.) Illustrate your help file by adding images and videos
To prepare images or video files for use in your help file, you may need a specialized graphic and/or video editing software tools. On our website, we have gathered some of the popular applications which are often used by help authoring professionals for creating images, screenshots, and videos to make a help file or printed document more clear and comprehensive.
To insert an image or video into a help topic:
- Click the Insert tab.
- In the Media group, click Picture (or Movie for a video).
- In the dialog, find a file that you want to insert.
- Click Open.
Here you can find screen capture tools and screen recording tools which are widely used in combination with help authoring software.
6.) Add hyperlinks to related topics and external resources
Hyperlinks are an important part of any electronic document including a web page, help file or PDF document which has been created mainly for viewing from the screen.
Adding hyperlinks into your help file makes it possible for the user to access related help topics or to immediately open a linked topic which, for example, explains a term or subject needed by the user to understand the initial topic.
To insert a hyperlink into a help topic:
- Click the Insert tab.
- Click the Hyperlink button.
- In the dialog window, type hyperlink text and define a topic to which it should follow when clicked in the compiled help file.
- Click OK.
As you might have noticed, you can link not only to a topic within the same help file or manual, but also to an external page, or to an email address, for example, when you need to provide your contact details.
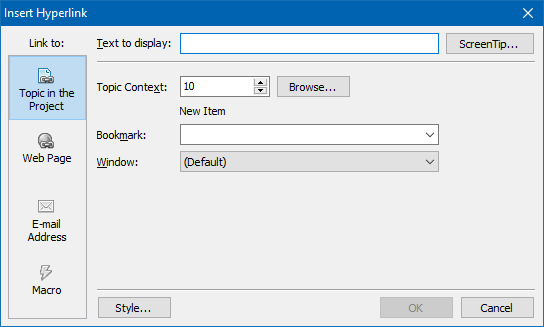
Inserting a hyperlink
Creating keyword Index
7.) Link topics with keywords to provide Index
If you provide the Index tab in the help file you have created, it will be much easier for the user of your help file to find one or more topics which are associated with a particular keyword.
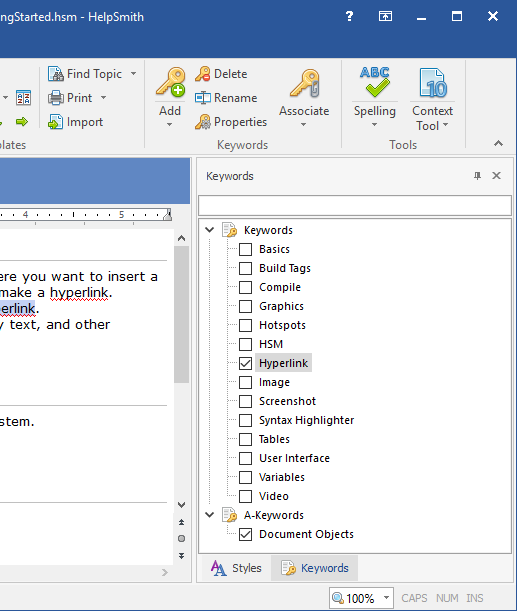
In the help authoring tool, you can use the Keywords feature to associate your help topics with keywords.
Adding keyword associations:
To add a new keyword and automatically link it with the current help topic, simply enter a new keyword at the top of the Keyword tool and then press Enter.
Similarly, you can check or uncheck existing keywords to add or remove their association with the topic you have opened for editing.
8.) Customize your help file and setup the document layout
On this step, depending on the kind of document you are creating (e.g., a help file or printed manual), you should edit the appearance of the help file or setup the document's layout.
To edit appearance and layout settings for a specific help format:
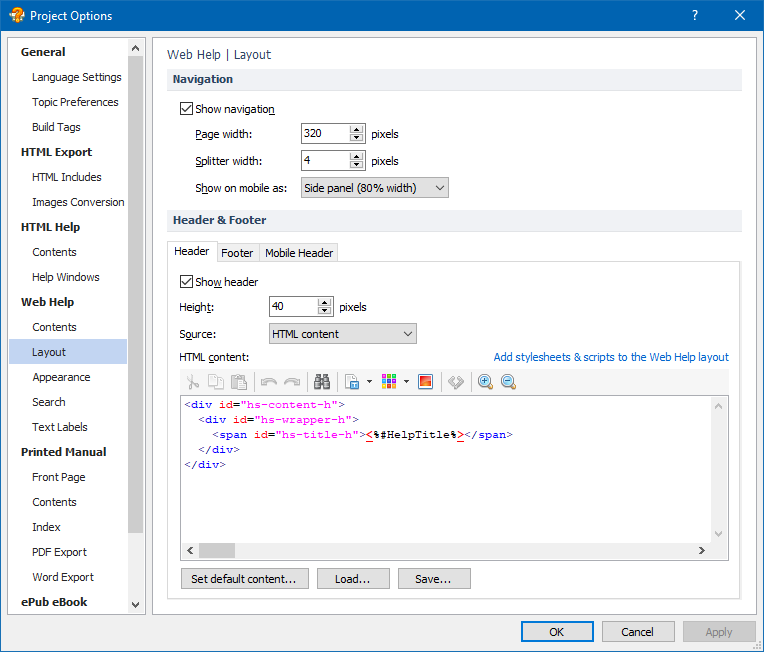
- Click the Project tab and then click Project Options.
- In the left part of the Options window, select appearance, layout, or behavior section (this may depend on the help file format such as CHM Help, Web Help system, Printed Manual, or PDF document).
For example, for a CHM help file, you can customize the behavior of the Table of Content and also the size and position of the HTML Help viewer window. For a Web Help system, you can change TOC settings, layout and appearance settings, and localize the help system's UI as well. Similarly, you can customize settings of a Printed Manual or Adobe PDF document.
Editing help file settings

Editing help file settings
9.) Define title, language and other parameters of your help file
Before you create your help file or manual, do not forget to define the document's title and copyright information.
To change these parameters:
- Click the Project tab.
- In the Project group, click Project Options.
- In the left sidebar, select the General section.
- Fill in the Title and other text values according to your needs.
- Click OK to save the changes.
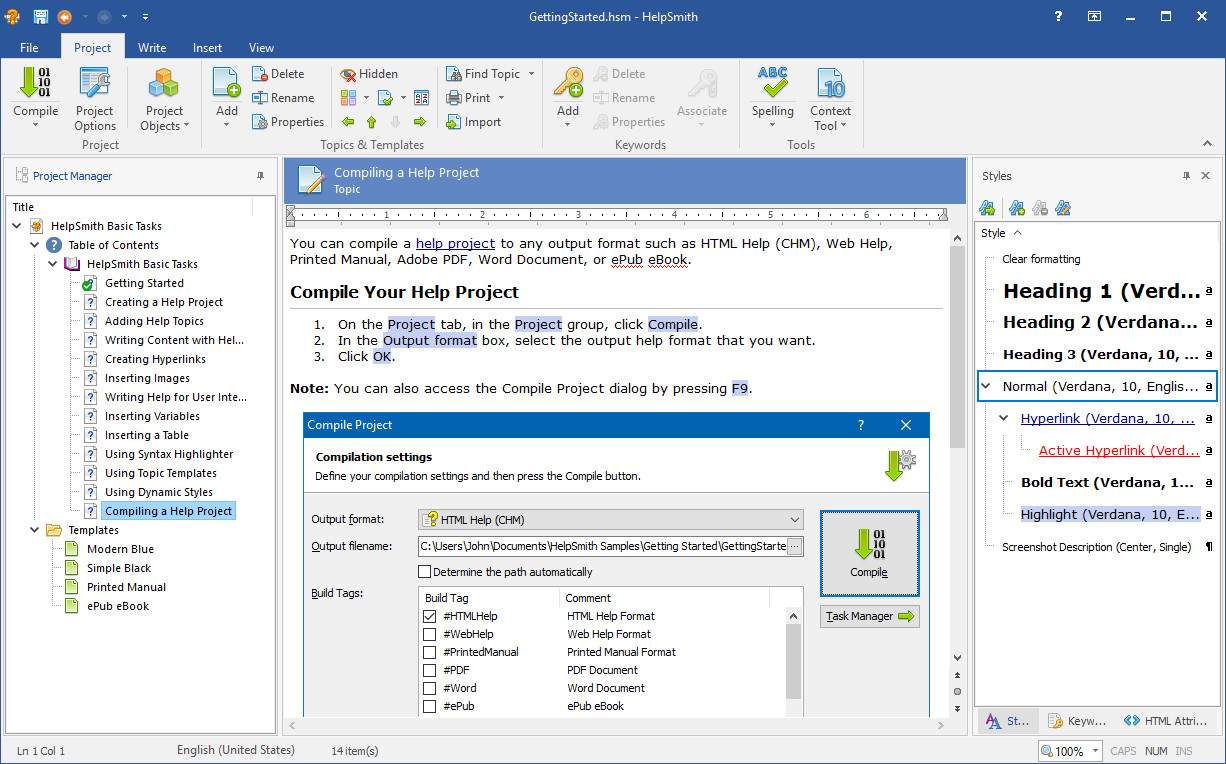
10.) Select an output format and compile
Now you can create your help file or printed manual by compiling the source help project:
- On the Project tab, click Compile.
- In the output format box, select the help format you want to create. For example, you may need to create a CHM file, Web Help system, Printed Manual, Adobe PDF document, or Microsoft Word document.
- Click OK to create and launch your help file.

Creating a help file from the source project
Download a Help Authoring Tool
If you a looking for a suitable tool to create your help file, you can view the Choosing a Help Authoring Tool section for the list of features that you may need to complete a particular project.
Also you can download one of the recommendable help authoring tools which includes support for multiple help formats, an easy-to-use UI, and advanced features such as conditional text.
| Details | Value |
|---|---|
| Filename | HelpSmithSetup.exe |
| File size | 65 MB |
| Platform | Windows 10/8/7/Vista/XP |
| System requirements |
1 GHz processor, 512MB RAM, 150MB free disk space |